The budget for the exchange was $10-20 per gift. As you'll
see, if I'd had to buy new materials for all the elements I included,
I couldn't have done it without going a little over. But many
of them were made from scraps left over from other projects, so
all they cost me was my labor.
I also created and tucked into the box a printout giving my
evidence for the authenticity of the various elements of the case
(similar to the information in the tables below, but abbreviated)
and a brief explanation of the purpose of each item with which
I thought the recipient might not be familiar (similar to the
information in parentheses in the list above). I consider such
inserts an important part of an S.C.A. gift, for two reasons:
(1) Many members of the Society choose to bring to events or to
use outside the confines of their personal camps only items that
meet certain authenticity standards, which vary from individual
to individual. When I share what I know about an item's plausibility
in a medieval or Renaissance setting I make it easier for the
recipient to decide whether it's "event-appropriate"for
her or him. (2) It's pretty common for one SCAdian to approach
another at an event and say, "I've never seen one of those
before. Where does it come from?" or something of the sort.
It's a lot more fun to show off a neat doo-dad at events if you
can answer such questions and maybe talk a little about the context
in which the item was originally produced or used than if you
have to say, "I don't know. But it is pretty, isn't it?"
Period Equivalent
|
Purchased Item(s)
|
Source
|
Purchase Price
|
|
Bentwood boxes have been in use across Europe for millennia.
Karen Larsdatter has compiled a
list of annotated links to period images of them and photos
of surviving examples that reflects their common use in the Middle
Ages as containers for all manner of things.
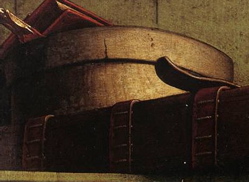 detail from Domenico Ghirlandaio's St. Jerome in
His Study, 1480
detail from Domenico Ghirlandaio's St. Jerome in
His Study, 1480
|
 The box is 7 inches in diameter.
|
A craft supply chain store--I don't remember
which. We'd had it stuffed in a closet for several years by the
time I started this project, having bought it for another one
that never got done. |
I'm not sure. I think it was about $3 (bought on sale). |
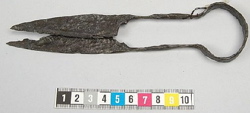
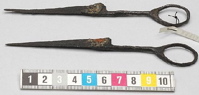 medieval scissors made of iron
|
 Fiskars classic forged steel #4 embroidery scissors
|
my local JoAnn
Fabrics and Crafts store |
about $3.50
(I used a 40% off coupon.)
|
 |
 |
The
Spanish Peacock |
$10
($5 each for two)
|
|
Christian de Holacombe and Michaela de Neuville's article,
"A
Period Workbox", says medieval pins were sometimes headed
with small blobs of glass. I couldn't find images of any, but
I did find this photo of medieval pins that, aside from the fact
that the heads are made of metal, closely resemble the ones I
bought.
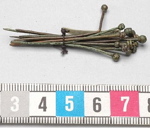
|
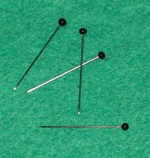 glass-headed pins
|
my local JoAnn
Fabrics and Crafts store |
about 25¢
(A pack of 40 was less than $2.50.)
|
| Multiple sources, including Heather Rose Jones'
article, "Archaeological
Sewing", indicate that flaxen thread (sometimes inaccurately
called "linen thread") was commonly used for sewing
in period. |
I loaded one of my thread winders with unbleached
flaxen thread, as you can see in the photo below. |
The Smoke and
Fire Company |
5¢ or less
(A whole spool was $6.)
|
| Flaxen thread is stronger and more resistant
to abrasion if it's run through a bit of beeswax before it's
used. It's generally assumed that this practice was common in
the Middle Ages. |
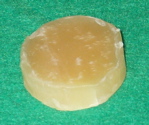 |
my local Tandy
Leather Factory store |
about $1
(I used a little less than one third of a one-ounce piece
that cost about $3.25.)
|
Evidence for Authenticity
|
My Version
|
Method
|
Materials Source and Cost
|
 a medieval thread winder made of horn
|
 made of poplar
|
I used a hand saw to cut inch-and-a-half long pieces of two-inch-wide,
one-eighth-inch-thick poplar, then to cut those pieces in half
along the grain. I sanded all sides with medium, then with fine
sand paper. Then I rubbed either long side of each rectangle
against a one-inch round wood rasp until I'd scraped a curve
of the desired depth into it. Finally I sanded the curved edges,
again with medium, then fine sand paper. |
roughly 10¢
(total, for all three)
The wood came from a local home improvement store. A two-foot
board cost about a dollar.
|
|
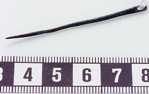
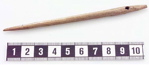
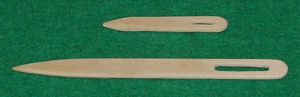
I haven't been able to track down any period images of eyelet
awls or any photos of surviving ones from the Middle Ages. The
fact that they were widely used is mentioned in multiple sources,
however, and they seem to be necessary for certain common applications
(like making drawstring holes on bags). I looked to commercially-available
awls for inspiration.
|
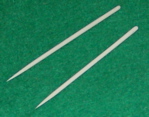
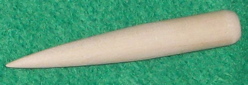 |
I used a hand saw to cut a piece of quarter-inch-diameter
craft dowel a little more than two and a half inches long, then
rubbed it at an angle against a flat wood rasp, turning it a
little bit every few strokes to create as regular a taper as
possible. When I had the basic shape I wanted, I rubbed the piece
against coarse, then medium, then fine sand paper to smooth it.
I used the same process to gently round the broad end of the
awl. |
maybe 5¢ |
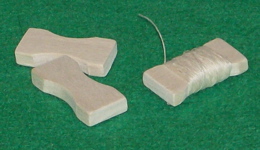
 medieval bodkin made of bone
|
 made of wood
|
I used two popsicle sticks for my bodkins. One I cut in half
width-wise and then trimmed down length-wise until the proportions
were about right. Then I rubbed either side of one end of each
stick against a flat wood rasp until it had roughly the taper
I wanted. I drilled small holes near the other end, roughly as
far apart as I wanted the ends of the slot in the bodkin to be.
Then I used a craft knife to cut out the wood between them. Finally
I sanded all sides of the bodkins and the slots. |
no cost
(The sticks were saved from frozen treats some months before
I used them. You could, alternatively, buy craft sticks or shave
down thicker lengths of wood to the right thickness.)
|
|
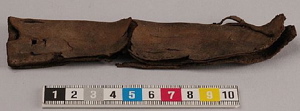
Leather cases were popular means of protecting all manner
of tools and decorative objects in the Middle Ages. Karen Larsdatter
has composed a list
of links to images that will give you an idea of the boggling
variety of their shapes and sizes. I made separate cases for
needles and pins, using the same piece as my inspiration for
both but tailoring the size and shape of each to the needles
or pins I planned to include in the kit.
 a medieval pin case made of leather
|
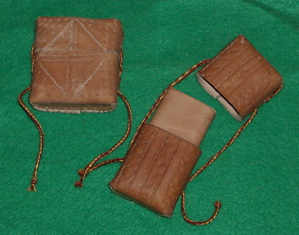 |
Each case consists of a leather box, decorated with stamping
on the front. There's a tube made of leather of the same weight
inside, which is attached at the bottom to the base of the box
and over which the lid slides when it's put on. A string connects
the lid to the base of the box, running through slots in both.
A description of the process by which I made them is available
on a separate page.
|
about $1.75
(total, for the cases and thimbles)
The leather and waxed linen thread came from my local Tandy Leather Factory
store. The leather was about $4 a square foot, I think (on sale).
The scraps I used totaled about 61 square inches. I don't remember
how much the thread was, but I used less than a yard, so that's
a few cents at most.
The silk thread I used to make the braid for the cases came
from a local embroidery supply store, The
Needle Works. I used couple of yards of it--a few cents'
worth.
|
|
I've seen many sources that say leather thimbles were common
in the Middle Ages, but haven't been able to find a description,
drawing, or photo of one. So I designed mine based on metal medieval
thimbles I've seen. Real medieval leather thimbles might have
looked nothing like these. Modern leather thimbles used for quilting
and leatherwork certainly don't. But since I had nothing else
to go on, I decided this was the best approach.
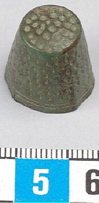
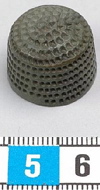 medieval thimbles made of bronze
|
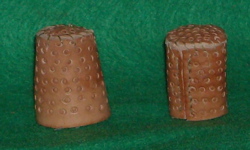 |
I cut a trapezoid for the tapered thimble, a rectangle for
the cylindrical one, and a circle for each. The ends of the trapezoid
or rectangle were joined with a butted seam, and the circle was
whip-stitched onto the top. On the tapered thimble the circle
is small and inset into the top. On the cylindrical one it is
larger and rests on the upper edges of the shaft. I'm not sure
which will, ultimately, be preferable. I used a small round leather
stamp to pattern the outside, to make the thimble less prone
to slip. The leather stiffened as it dried, and the thimbles
are pretty rigid. |
|
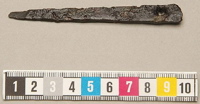
I've found no evidence of sheaths of any kind being used for
scissors in period. However, medieval people did make a stunning
variety of leather cases, covers, and sheaths of various other
types to protect all sorts of items. I think it reasonable to
speculate that a scissors-sheath of some sort might have existed.
I've seen sheaths for knives that seem to have been made of fairly
soft leather folded around the blade and stitched along one side,
and it seems to me a plausible approach to making one for scissors.
 medieval knife sheath
|
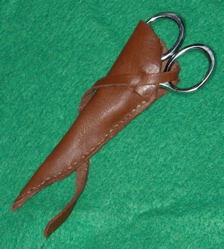 |
The soft leather I used was left over from another project.
There happened to be a small, roughly triangular section attached
to the rest of the piece only by a long, skinny strip. I cut
it free partway along the strip, then folded the triangle in
half around the blades of the scissors and trimmed it to fit.
(There was virtually no waste.) Positioning the folded triangle
so that the strip was in the back, I marked the locations for
two short slits on the front. I cut them, then sewed the long
edges of the triangle together using a double running stitch.
When the sheath is in use, the strip runs through one handle
of the scissors, in one slit, and out the other. Friction keeps
it in place, and it keeps the scissors from slipping out of the
sheath. |
about 20¢
We bought an entire side of this leather a couple of years
ago, at about $4 a square foot, I think (on sale).
|
|
I didn't want to leave the beeswax loose in the box, lest
it melt in the heat of some glorious Ansteorran summer (or spring,
or autumn) and ruin a project or damage tools. The website of
The
Vikings (a U.K.-based re-enactment group) mentions a number
of leather pouches found at the Haithabu site that were simply
circles of leather with thongs run around them. The finds date
to an earlier period than most of my inspiration pieces, but
the design is so simple and string-drawn pouches of all kinds
were so popular in the Middle Ages that I find it very likely
that a pouch of this type would excite no comment in the later
period. It has, additionally, the advantage of allowing the user
to spread it completely flat, if need be, to get at a lump of
wax melted to the bottom, or to open it into a saucer-shape and
let it double as a resting-place for wax that's being used.
I made my pouch smaller than the dimensions given in the kit
guide for The Vikings. There's no mention on that site as to
whether the recommended size is typical of all the artifacts
or is simply a convenient one for a belt-pouch, and I knew a
pouch of the size described would be too big for my purposes.
I would've used thinner thonging to tie the bag, it being
so small, but I didn't have any on hand. The scraps I did have
make the bag a little stiff to open, but I think that will change
as the leather softens with use. If not, it should be a simple
matter for the recipient to replace it.
|
 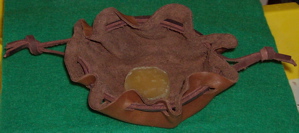 |
Using a saucer as a template, I drew a six-inch circle on
a scrap of soft leather. I cut the circle out. Then I made twelve
evenly-spaced slits around it near the edge and threaded two
thongs through them, beginning and ending each one on the side
opposite the other. I tied the ends of each thong together, and
a good tug on both drew the circle up into a pouch. |
about $3.40
The leather was another scrap of what I used for the sheath.
The thonging was from a bag of scraps bought by the pound; I
don't think it cost more than a few cents.
|
Medieval needle cases came in many forms (far too many to allow
me to give a representative sample here). The simplest were just
segments of bird bones with the marrow cleared out and wooden
stoppers in both ends. Plain and decorated metal tubes were also
popular, as were multiple types of leather cases. Karen Larsdatter's
annotated links
to sites related to medieval and Renaissance tailors, seamstresses,
and sewing tools will lead you to images of a variety. Billy
and Charlie sell a lovely pewter one shaped like a tower that's
based on Dutch and English 15th-century exemplars. Steve
Millingham Pewter Replicas sells another 15th-century design,
featuring devotional phrases. And Martin
and Dörte Planert make bronze and silver replicas of
an ornate silver pendant needle case from 12th-century Russia.
If you can point me to photos or medieval images of any additional
items one might include in a medieval sewing kit, please share.
I'd love to learn more.
 I put this kit together for a gift
exchange at a local Yule revel. I tried to include as many as
possible of the basic tools anyone trying to do medieval-style
hand sewing would need, and chose a box big enough to accommodate
additional tools the recipient might want to add (or small in-progress
projects).
I put this kit together for a gift
exchange at a local Yule revel. I tried to include as many as
possible of the basic tools anyone trying to do medieval-style
hand sewing would need, and chose a box big enough to accommodate
additional tools the recipient might want to add (or small in-progress
projects).