![]() Somehow I never thought of pom-poms as something
that might have been around in the Middle Ages. But then one day
I was looking at some 13th-century
illustrations, and there they were, decorating the bottoms
of three shoulder-bags. When I thought about it, I realized it
shouldn't be all that surprising. Pom-poms are easy to make, and
don't require materials or tools not available to medieval crafters.
They're also similar in concept to tassels,
which I've seen on surviving medieval artifacts.
Somehow I never thought of pom-poms as something
that might have been around in the Middle Ages. But then one day
I was looking at some 13th-century
illustrations, and there they were, decorating the bottoms
of three shoulder-bags. When I thought about it, I realized it
shouldn't be all that surprising. Pom-poms are easy to make, and
don't require materials or tools not available to medieval crafters.
They're also similar in concept to tassels,
which I've seen on surviving medieval artifacts.
A babysitter taught me how to make pom-poms using a table fork when I was in elementary school. Her method will work with any pronged item, including the original human tools, fingers.

 You begin
by cutting a short length of yarn or string and laying it between
the prongs. This can be the same yarn you want to show in the
finished pom-pom, or something thinner. Make sure it's strong.
If you're using a fork or something else with multiple prongs,
put it between the middle two.
You begin
by cutting a short length of yarn or string and laying it between
the prongs. This can be the same yarn you want to show in the
finished pom-pom, or something thinner. Make sure it's strong.
If you're using a fork or something else with multiple prongs,
put it between the middle two.
Lay one end of the yarn you want to show in the pom-pom between the middle prongs. Hold it in place, and start wrapping the yarn around the prongs in a figure-8 motion (clockwise around one prong, through the middle, and counterclockwise around the other prong).
If you've got multiple prongs, weave in-and-out between them, from the center out to one end, back to the center, and then out to the other end. If you need to start a new piece of yarn, end the old one and begin the new one at one outer edge.
Keep going until you've got all the yarn you want in the pom-pom wrapped around the prongs.

 Pick
up the ends of the short piece of yarn or string that you laid
down at the beginning, and cross one under the other (making the
first half of a square knot). Pull on both ends firmly, until
the tie is as snug as possible. (If you've got yarn wrapped around
the fingers of one hand, use the thumb of that hand to hold down
one end of the tie and the other hand to pull on the other end.)
Pick
up the ends of the short piece of yarn or string that you laid
down at the beginning, and cross one under the other (making the
first half of a square knot). Pull on both ends firmly, until
the tie is as snug as possible. (If you've got yarn wrapped around
the fingers of one hand, use the thumb of that hand to hold down
one end of the tie and the other hand to pull on the other end.)
Carefully slip the yarn off the prongs. Tighten the tie again, as much as you can, and finish the knot. You'll have a little "butterfly" of yarn, tied in the middle. If you used a multi-pronged tool to make the butterfly, use your fingers to gently straighten out the yarn, so you have one big loop on either side of the tie.

 Put one
blade of a pair of scissors through a loop of the yarn, pull the
threads taut against the blade, and cut. Repeat with the other
loop. Now you'll have a bundle of short pieces of yarn, tied in
the middle.
Put one
blade of a pair of scissors through a loop of the yarn, pull the
threads taut against the blade, and cut. Repeat with the other
loop. Now you'll have a bundle of short pieces of yarn, tied in
the middle.
Trim any extra-long ends so that the yarn ends all match up fairly well.
If you're going to sew the pom-pom to something, don't cut off the ends of the piece of string or yarn you used to tie the bundle together. Leave it long, thread one end onto a needle, and sew through the object you're attaching to, through the loop of the tie, and through the object again until you've got just enough left to tie a knot. Repeat with the other end, then tie the ends together very securely (hiding the knot either inside the pom-pom or inside the object). The pom-pom will be firmly attached.
Use your fingers to fluff out the pom-pom so that it's more-or-less spherical, and the tie doesn't show. How bushy the pom-pom is will depend on the flexibility and diameter of your yarn, the distance it had to travel to go around the prongs, how many times you wrapped it around, and how firmly you cinched it in before you tied the knot to bind it together (the firmer the better).


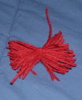
 The red pom-pom and the green pom-pom to the
left were both made using the same tools, wrapped until approximately
the same volume of yarn was on the prongs. The green pom-pom is
made with a much finer yarn, so it had to be wrapped significantly
more times. After I took those pictures, I trimmed the yarn in
both pom-poms to about half its original length. This not only
made the pom-poms smaller, it made them look much fuller, as seen
in the photo to the right. You could achieve a similar effect
by wrapping more yarn around the prongs to begin with.
The red pom-pom and the green pom-pom to the
left were both made using the same tools, wrapped until approximately
the same volume of yarn was on the prongs. The green pom-pom is
made with a much finer yarn, so it had to be wrapped significantly
more times. After I took those pictures, I trimmed the yarn in
both pom-poms to about half its original length. This not only
made the pom-poms smaller, it made them look much fuller, as seen
in the photo to the right. You could achieve a similar effect
by wrapping more yarn around the prongs to begin with.
This website is maintained by Coblaith Muimnech, who holds the copyright on all content not attributed to others. Printed copies may be made and distributed for non-commercial purposes, provided the author is credited. Please do not reproduce this article, with or without its accompanying illustrations, elsewhere on the Internet without first obtaining specific permission.
Click to visit Coblaith's homepage.