 Zig-zag
along (or overcast) the top edge of one of the lining-fabric body
pieces. Fold the same end down (wrong sides together) by half
an inch and press.
Zig-zag
along (or overcast) the top edge of one of the lining-fabric body
pieces. Fold the same end down (wrong sides together) by half
an inch and press.If you didn't come here from the main page for these bags, you may find yourself somewhat confused; I recommend you visit it.
You will need a strap for each bag. You could use a tube of fabric or a length of strapping woven to width for a flat strap (like those shown in the image from leaf 15), or a length of fingerloop braid or something similar for a skinny strap (like those in the image from leaf 10). The strap should be long enough to go from the bearer's hip, over the opposite shoulder, and back to the same hip, with about an inch to spare. I used three-and-a-half-inch-wide selvage-to-selvage strips (cut from fabric fifty-eight to sixty inches wide before pre-shrinking) to make fabric-tube straps for the larger bags and three-inch-wide forty-inch-long strips for the smaller bags.
The decorations on the bags the Gibeonites carry do look wispy, like tassels, to me. Those on the bags the Levite and his wife carry are, however, rounder, and look more like pom-poms. It's easy enough to make either, and neither requires out-of-period tools or materials. If you want decorations on your bag, I say take your pick, and get your decorations ready before you start.
Cut two body pieces and one flap from your outer fabric, and the same from your lining fabric.
Zig-zag
along (or overcast) the top edge of one of the lining-fabric body
pieces. Fold the same end down (wrong sides together) by half
an inch and press.
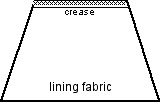
Zig-zag up the last three-quarters of an inch on one short side of the lining-fabric flap, across that long end, and down the first three-quarters of an inch of the other short side. Fold the end down (wrong-sides-together) by three-eighths of an inch and press. Fold each side of the flap in (wrong-sides-together) by a half inch and press a half-inch-long crease at the stitched end.
 Lay one outer-fabric body piece
right-side up. Position the ends of your strap three-quarters
of an inch from either end of the top edge of that piece. Put
the outer-fabric flap, right-side down, on top of that, so that
the short edges of all three are aligned. Pin the pieces together,
through all layers, and then stitch along the common edge, leaving
a half-inch seam allowance, starting half an inch from one side
of the flap and stopping half an inch from the other.
Lay one outer-fabric body piece
right-side up. Position the ends of your strap three-quarters
of an inch from either end of the top edge of that piece. Put
the outer-fabric flap, right-side down, on top of that, so that
the short edges of all three are aligned. Pin the pieces together,
through all layers, and then stitch along the common edge, leaving
a half-inch seam allowance, starting half an inch from one side
of the flap and stopping half an inch from the other.
Run the fabric through the machine again, adding a second row of stitches just to the edge-side of the first. Then zig-zag stitch through all layers just to the edge-side of the second row of stitches. (This seam is going to support the weight of the bag, so it's a little more heavily reinforced than the rest.) Firmly press the seam allowances down, toward the body piece.
 Line up the two flaps, right-sides-together,
so that the crease in the lining-fabric flap is toward the seam
between the outer-fabric flap and the outer-fabric body. Do not
have the lining-fabric flap folded at the creases. Pin the two
layers together, then stitch from just above the seam at the base
of the outer-fabric flap up one side, across the end, and down
the other side to just above the seam. Clip the stitched corners,
then zig-zag just to the edge-side of the stitching.
Line up the two flaps, right-sides-together,
so that the crease in the lining-fabric flap is toward the seam
between the outer-fabric flap and the outer-fabric body. Do not
have the lining-fabric flap folded at the creases. Pin the two
layers together, then stitch from just above the seam at the base
of the outer-fabric flap up one side, across the end, and down
the other side to just above the seam. Clip the stitched corners,
then zig-zag just to the edge-side of the stitching.
Place the two outer-fabric body pieces right-sides-together
and pin.  (The flap will lie between them;
fold the edges of it in out of the way when you pin toward the
tops of the body pieces, so it doesn't get pinned.) Stitch down
one side, across the bottom, and up the other side. Take care
not to stitch into the strap or flap. Start with a half-inch seam
allowance at the top, and taper to a quarter-inch at the bottom
of each side. Use a quarter-inch seam allowance along the bottom.
Clip the corners. Zig-zag stitch through both layers just to the
edge-side of the stitches. Trim the seam allowance as close to
the zig-zagging as possible without cutting into the stitches.
Turn the flap and body right-side-out.
(The flap will lie between them;
fold the edges of it in out of the way when you pin toward the
tops of the body pieces, so it doesn't get pinned.) Stitch down
one side, across the bottom, and up the other side. Take care
not to stitch into the strap or flap. Start with a half-inch seam
allowance at the top, and taper to a quarter-inch at the bottom
of each side. Use a quarter-inch seam allowance along the bottom.
Clip the corners. Zig-zag stitch through both layers just to the
edge-side of the stitches. Trim the seam allowance as close to
the zig-zagging as possible without cutting into the stitches.
Turn the flap and body right-side-out.
Place the two lining-fabric body pieces right-sides-together and pin. Stitch down one side, across the bottom, and up the other side, leaving a half-inch seam allowance. Clip the corners. Zig-zag stitch through both layers just to the edge-side of the stitches. Trim the seam allowance as close to the zig-zagging as possible without cutting into the stitches.
Put the outer-fabric body inside the lining-fabric body, so that the two are right-sides-together and their side seams are matched. Make sure the zig-zagged and creased edge of the lining is toward the straps. Pin and then stitch across the front edges, leaving a half-inch seam allowance. Zig-zag between the stitching and the fabric edges or overcast the edges.
Reach in through the opening between the straps and the zig-zagged edge of the lining. Grab the bottom of the outer-fabric body, and pull it out. It will turn right-side-out as you go. Take a moment to make sure the corners are completely turned. Then stuff the lining down inside it, enclosing all stitched edges.
Make sure the unstitched edge of the lining-fabric body is folded down along the crease, and the seam allowance along the seam between the flap and the bag is down, toward the bag. Fold the bottom of the lining-fabric flap along the side creases, then the bottom crease, so the extra fabric is tucked away inside the flap. Close the opening using an blind seam stitch.
Press around the opening of the bag, from the inside. Fold the flap down and press the fold.
Add tassels or pom-poms, if you like, using the images from the Maceijowski bible as a placement guide.
A printer-friendly version of these directions is available in PDF.
This page was written and is maintained by Coblaith Muimnech, who owns the copyright to all portions of it, including all illustrations not excerpted from works more than 300 years old. Please do not reproduce any portion of it without explicit permission.
Click to visit Coblaith's homepage.